Tuesday, 13 January 2015

Oracle E-Business Suite Release 12.2 Installation Guide

Oracle E-Business Suite Installation Guide(Release 12.2 (12.2.0))

Rapid Install offers two options for a new installation: a standard installation, which involves creating a new system using system-specific configuration parameters, and an Express installation, where Rapid Install supplies default values for many parameters, requiring only a few to be supplied by the user carrying out the install.

In this Post we shall use the Standard Installation which is most commonly used Installation techniques in Real-time Projects.

Standard Installation
  • fresh database is fully configured and ready to be used for a new implementation. This type of database is suitable for any type of system that requires a fresh database, such as a production system or test system. The default name for a production database is PROD. If you are installing a database for another use, for example as a test system or a backup system, choose the Fresh Database option and enter a database name that reflects its purpose, for example TEST.
  • Vision Demo database is used for demonstration or training purposes. It contains a fully configured Oracle E-Business Suite system that has been implemented and populated with a set of transactions for a fictitious company. The Vision Demo database is set up for multiple-organization use. It is installed with the AL32UTF8 character set to maximize the support for character sets in this release. The default database name is VIS.

oracle.sysman.assistants.rconfig.engine.InvalidConfigurationException:
Node that has single instance database running should be specified in the NodeList.
Please specify node TESTSYS as part of NodeList at
oracle.sysman.assistants.rconfig.engine.ClusterStep.checkNodeList(ClusterStep.java:203)

This section describes the setup steps for a standard installation, where the user supplies various system-specific parameters.
Important: Before you perform the steps described in this section, you must have created a stage area. You do not carry out the installation steps on every node that will be part of your Oracle E-Business Suite system. You carry them out on the database node and primary Applications node, apply the latest release update packs, then use standard cloning commands to scale up to the required number of Applications nodes.

Start the Rapid Install wizard
Start the wizard from the command line by entering rapidwiz at the prompt. The Welcome screen lists the database and the technology stack components that are installed with Oracle E-Business Suite.
This screen lists the components that are included in, or supported by, this release of Oracle E-Business Suite. You can expand the component lists, using the scroll bar to bring all the components into view.
A new installation includes a fresh Oracle 11g Release 2 (11gR2) database. In an upgrade, Rapid Install can optionally create an Oracle 11gR2 database Oracle Home without a database. You can use this Oracle Home to upgrade or migrate your existing database to Oracle 11gR2. Alternatively, you can choose to use a suitable existing Oracle Home.
Welcome Screen
the picture is described in the document text
This screen is for information only. No decisions need to be made. When you have reviewed the information, click Next to continue.

Select Wizard Operation - Install Oracle E-Business Suite Release 12.2.0
the picture is described in the document text

Supply Email Details for Security Updates
the picture is described in the document text
If submission of your details fails because no connection can be made, you are presented with a pop-up screen prompting for proxy server information:


the picture is described in the document text
If this screen appears, respond appropriately and then click OK.

Configuration Choice
the picture is described in the document text
If you choose Create a new configuration , Rapid Install saves the configuration parameters you enter on the wizard screens in the Oracle E-Business Suite database, and in a configuration file (conf_<SID>.txt), which is stored in your system temporary directory until the installation is completed.
If you choose Load the following saved configuration, the database connect string field becomes active. For a configuration stored in the database, this field is made up of <hostname>:<SID>:<database port>, for example server1.example.com:VIS:1521.
Important: The host name must include the domain.
Enter the appropriate database connect string (or conf_<SID>.txt file location, if applicable) to point Rapid Install to a stored configuration whose parameters you wish to use. Typically, you would choose this option when performing a multi-node install.
Note: If Rapid Install is being run on the database tier using the Load the following saved configuration option, you must enter the default password for the APPS database user.
After completing this step, click Next to continue.

Global System Settings
the picture is described in the document text
The default value of the Port Pool set is zero, but you can customize it by selecting another value from the drop-down list in the Port Pool field. There are 100 port pool selections: if you select an increment of 3, the default values are increased by that value. The Database Port (1521) becomes 1524, the RPC Port (1626) becomes 1629, and so on.
At this point, you can simply accept the values for the chosen Port Pool (and therefore individual ports) by clicking Next. This will suffice for many installations.
Otherwise, you can add an extra level of sophistication by specifying individual port values to meet particular site-specific requirements, over and above the basic use of the Port Pool mechanism described above. For example, you might wish to avoid using a particular port for some reason, perhaps because it will be needed by some other software. Clicking on the Edit Ports button will open a screen that allows you to specify the values of any ports you wish.

the picture is described in the document text
When finished on this screen, click OK to return to the Global System Settings screen, and click Next on that screen.

On the Database Node Configuration screen, indicate the kind of database you want to install in the new system, the name you will use to identify it, the machine on which it will run, and that machine's domain name. You then need to confirm the operating system shown on the drop-down list is correct, specify the Oracle user's operating system account name and group, and finally specify the base directory under which the installation is to take place.


Database Node Configuration
the picture is described in the document text
You can install either a fresh database or a Vision Demo database.
Choose Directory
The Database Base Dir field defaults to a sample directory name, using the operating system syntax for the machine where you started the Rapid Install wizard. This directory is the top-level directory that Rapid Install uses to derive the mount points associated with the database.
the picture is described in the document text
On this screen, click on a suitable folder, or type a path in the Directory field. Click OK to confirm your choice and return to the Database Node Configuration screen, or click Cancel to return without making a selection.

As well as letting you specify the type of storage where the database files will reside, the Database Node Configuration screen enables you to specify whether this database node will be part of an Oracle Real Application Clusters (Oracle RAC) system.
Before you perform an Oracle E-Business Suite installation on Oracle RAC, you must ensure that the necessary Oracle Grid infrastructure is in place. For instructions on how to do this, refer to Section 5: "Use Rapid Install to Install a RAC Configured Oracle E-Business Suite Release 12.2 system" of My Oracle Support Knowledge Document 1453213.1, Using Oracle 11g Release 2 Real Application Clusters and Automatic storage management with Oracle E-Business Suite Release 12.2. Failure to follow these instructions will result in problems during Oracle E-Business Suite installation in your Oracle RAC environment.

Important: When installing the Grid Infrastructure, you must specify the hostname in lower case. Otherwise, Rapid Install will fail with an error like this:
In this example, the issue was caused by the hostname TESTSYS being in upper case.


Important: The setting of the compatible database initialization parameter must be the same for both the Oracle E-Business Suite database and the ASM instance and ASM disk groups. The Oracle E-Business Suite database parameter is set to 11.2.0 for all platforms except Exadata, where it is set to 11.2.0.2.


Select Licensing Type
When installing a fresh database (not a Vision demo database), the wizard prompts you to indicate the type of licensing agreement you have purchased from Oracle. It then presents the appropriate licensing screen.
Completing a licensing screen does not constitute a license agreement. It simply registers your products as active. The only way to set up a license agreement is to purchase Oracle E-Business Suite products through the Oracle Store or an Oracle sales representative. You should have complete information about your product license before you complete the licensing screens.
the picture is described in the document text

License Additional Products
the picture is described in the document text

License Products
the picture is described in the document text


Select Country-Specific Functionalities - Initial Screen
Select Country-Specific Functionality (Fresh Database installation only)
Some systems require the country-specific functionality of a localized Oracle E-Business Suite product. For example, if your company is based in the United States but also operates in another country, products such as Human Resources require additional features to accommodate the labor laws and codes that differ from those in the United States. You register the name of the region associated with the localized product on the Select Country-specific Functionality screen.
If your company operates only in the United States, you can bypass this screen. If you begin doing business in another country at a later date, you can use License Manager to register the associated region at any time after the original installation or upgrade.
the picture is described in the document text

Select Country-Specific Functionalities - Subsequent Screen
the picture is described in the document text

Select Internationalization Settings
the picture is described in the document text
The languages you select help determine the available options for the other NLS-related configuration parameters (such as territory and character set) that your system requires and can support.

Note: See Globalization Support in Oracle E-Business Suite Concepts.


Primary Applications Node Configuration - UNIX
the picture is described in the document text
The default sample directories use the syntax of the operating system where you started Rapid Install. In addition, some of the fields are specific to the operating system in use.
The above example shows this screen for a Linux system, where you need to complete the information for Apps OS User (the account that owns the Applications tier file system and technology stack) and Apps OS Group (the group to which the Apps OS User belongs). Accept the defaults, or enter new values.
On all these Primary Applications Node Configuration screens, the Base Directory is the top-level directory that Rapid Install will use to derive the mount points for the Applications nodes. You can accept the defaults or enter new values.

Important: You must accept the system-supplied defaults for the derived mount points.

The services provide the following functionality:
Applications Node Services Summary
This Service Group:Supports:
Root Service
  • Node Manager
Web Administration
  • WebLogic Admin Server
Web Entry Point Services
  • Oracle HTTP Server
  • Oracle Process Manager
Web Application Services
  • OACORE
  • OAEA
  • OAFM
  • Forms
  • Forms-C4WS
Batch Processing Services
  • Oracle TNS Listener
  • Concurrent Manager
  • Fulfillment Server
  • Oracle ICSM
Other Services
  • Oracle Forms Services
  • Oracle MWA Service
Currently, the following additional instructions apply to installing and activating application tier services:

  1. Perform the installation on the node that has been chosen to have the Web Administration (WLS Server Administration) and Web Entry (Oracle HTTP Server) service groups enabled, and then run AutoConfig on this node.
  2. Be aware that when subsequently installing on the secondary (managed) nodes, Rapid Install will not run adstrtall.sh, so services will not be running and the installer will display a message to this effect at the end of the install. This failure of the post-install checks is expected.
Applications nodes have all services enabled by default..They should have services enabled according to the following criteria:

  • To support Web and Forms services: Root Service, Web Entry Point Services, Web Application Services
  • To support Concurrent Processing services: Batch Processing Services


Supply Application User Information
the picture is described in the document text
The Apps OS User password is needed for setting up Secure Shell (ssh) on the application tier nodes, and must be the same on all these nodes.
The checkbox to change the default passwords is automatically ticked when this screen appears. We strongly recommend accepting this, and changing the passwords accordingly. If you wish to retain the standard passwords, untick the box.

Review Node Information
the picture is described in the document text
At this stage, you have specified details for the database node and the primary Applications node. Instead of creating additional Applications nodes using Rapid Install, you complete the Rapid Install run, apply the latest AD and TXK patches, and then clone the primary Applications node to create as many additional ones as you need. This avoids the need to apply the patches to multiple nodes, saving time and effort and reducing the risk of error.


Pre-Install Checks
the picture is described in the document text
The parameters that Rapid Install validates and reports on this screen include:
Pre-Install Tests and Parameters
This test:Checks:
Port AvailabilityThe ports you selected are available for use.
Database Pre-install ChecksThe Oracle E-Business Suite Database meets the necessary requirements.
Port UniquenessThere are no duplicate defined ports for server processes.
File SpaceThe specified file systems have sufficient space.
Stage Area CheckThe stage area is valid.
Web Server Install PrerequisitesOracle HTTP (Web) Server requirements have been met.
Mid Tiers ConnectivityApplication tier connectivity is working.
OS User and Group CheckThe OS user account and group exist, and the user account is a member of the group.
File SystemsThe specified file systems exist and have correct privileges.
Host/DomainThe host and domain names are valid.
System UtilitiesThe required system utilities are available.
The results of each test are labeled with icons. There are three result types:
  • Tick (check mark)
    The test succeeded. Click the tick to see details of the test performed.
  • Exclamation mark (!)
    The configuration requires review. Click the ! to get information about the system test review. Click Yes to continue, or No if you are going to resolve the issues. Rapid Install displays an alert if you continue without resolving the issues.
  • An x mark
    All issues marked x must be resolved before you continue with the installation. Click the x to see the errors. If you can resolve an issue by altering the values provided on one of the wizard screens, click Back until you reach the appropriate screen, and re-enter the values. Some tests must be resolved in the operating system. In that case, you may have to restart the Rapid Install wizard after the problem has been fixed.
    If problems are identified, a pop-up window will appear:
    Configuration Alert
    the picture is described in the document text
When you have resolved any issues, click Next on the Validate System Configuration screen to continue with the installation.
Important: For an upgrade with an existing Oracle Home, when the database is down the following pre-checks will show a warning as they cannot be tested automatically (Bug 20083150). You should manually ensure that the check results are correct.


Review Components
the picture is described in the document text
Click Next. Rapid Install now displays another alert screen asking you to verify that you are ready to begin the installation. Click Yes.

Begin Installation
the picture is described in the document text


Installation Progress

During an installation, Rapid Install displays a main progress bar and an individual progress bar. The main progress bar reports on the completion percentage of the installation as a whole. The individual progress bar reports on the progress of each individual step.
Warning: The installation is not complete until all the progress bars disappear from your screen.

the picture is described in the document text


Post-Install Checks
If there is an ! or x icon, click it to see the details. If any of the checks fail, refer to the Rapid Install log files to determine the reason, and resolve each problem before continuing. When the errors are fixed, click Retry to perform the post-install validation again.
the picture is described in the document text

Rapid Install informs you of the components that it installed on the Finish screen.
If you wish to review the Post-install Checks screen, click Back. If you want to log on to Oracle E-Business Suite now, click Connect to Oracle Applications Release 12.2.0 to access the Oracle E-Business Suite Login page. Otherwise, click Finish to complete the Rapid Install session.

##Please comment and write to me at akash007.pramanik@gmail.com


###### Disclaimer - This is a general purpose document for reference purpose. Please contact me on mail for any professional help on E-Business Suite or any Database Technologies.

Author - Akash Pramanik
Database Technology Consultant
Mail - akash007.pramanik@gmail.com

Tuesday, 7 October 2014

Oracle data Integrator Tutorial --- Part 2 -- (Repositories)

To create a work repository right clicks on Work Repositories under Repositories tree in Topology navigator and select New Work Repository.
A Create Work Repository window is opened and put the following details –
In Step 1 of 2:
Technology : Technology used for creating the repositories that means the type of database e.g. oracle, sql server etc.
JDBC Driver : JDBC driver used in specified technology. In Oracle technology it is oracle.jdbc.OracleDriver.
JDBC Url: JDBC url to mention the connectivity of that server. In Oracle technology select jdbc:oracle.thin@<host><port><sid> from the dropdown list and change <host>,<port> and <sid> parameters accordingly.
User: user/schema for master repository. [odiw]
Password: password for that user. [odiw]
Press Test Connection button to check the connectivity. Press OK in Information window. Click Next.
 
 
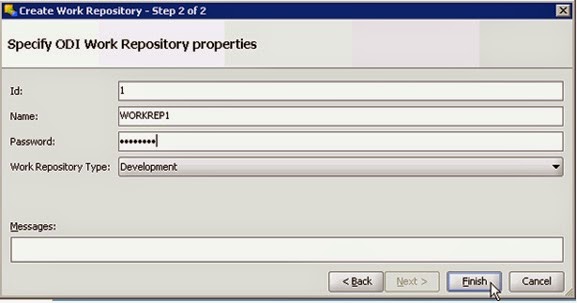
In Step 2 of 2:
Id: Work repository id. By default the first repository under master repository is 1. You can change it.
Name: Name of the work repository.
Password: Password for work repository.
Work Repository Type: Select the nature of work repository .it is Development or Testing or Production.
Click Finish.
 
 
To connect to specified work repository you click on Connect To Repository… in Topology navigator and select the necessary login name from the drop down list. After putting the proper password press OK.
 

Topology:
After logging into ODI your first objective is to create the necessary topologies used for your ODI tasks.
In the topology navigator you have to define the detailed information including technologies, server definitions, schemas, contexts, languages etc.
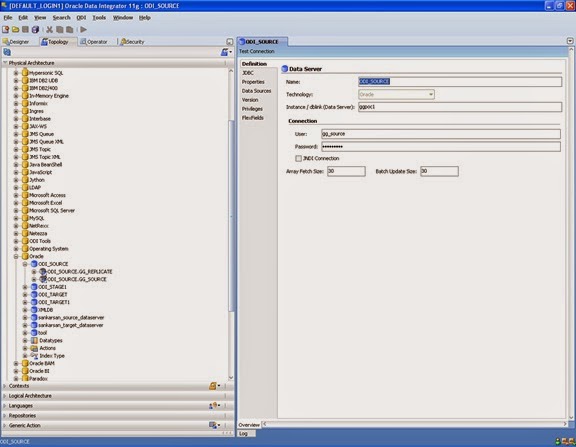
First of all you define the data server responsible for your source and target database. Expand the technology tree under Physical Architecture and select Oracle. Right click on it and select New Data Server.


In the detailed information page under Definition tab write down the following information-
Name:  name of the data server.
Instance/dblink (data server): name of the database instance.
User: name of the user of database (except sys/system).
Password: password of that user
Array fetch size and batch update size are the parameters required for row based operation performed by some KM.
You can increase the size for better performance (by default it is 30)
 
In the JDBC tab put the following information –
JDBC Driver:  Select oracle.jdbc.OracleDdriver from the dropdown list.
JDBC Url: Select jdbc:oracle.thin@<host><port><sid> from the dropdown list and replace <host>, <port>, <sid> with the actual information shown in the below picture.
Press save button afterwards.

Under Definition tab put the following details-
Schema (Schema) – Oracle schema which is the candidate of either source or target schema.
Schema (Work Schema) – Oracle schema where all kind of work table to be stored .
Check the box against Default to make it default physical schema.
Press save button in toolbar.

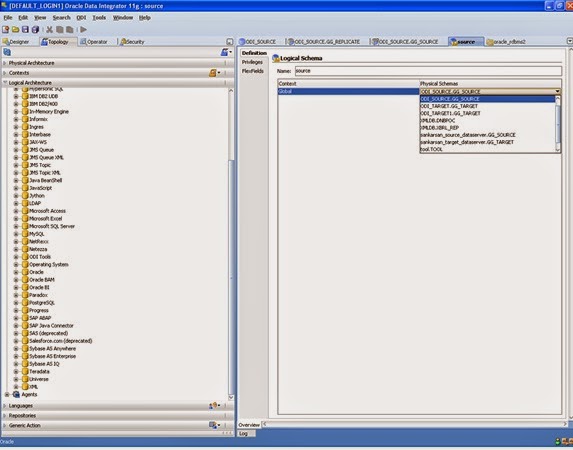
In the Definition tab under logical schema put the following details –
Name: Name of the logical schema.
Select the appropriate physical schema for the Global context (as there is no other context yet to be created)
Press save button in the toolbar.
After creation of all the required topologies your next step is to create the necessary models for the source as well as target database.
Under Designer navigator in the Model tab select the right hand icon and after clicking select New Model.
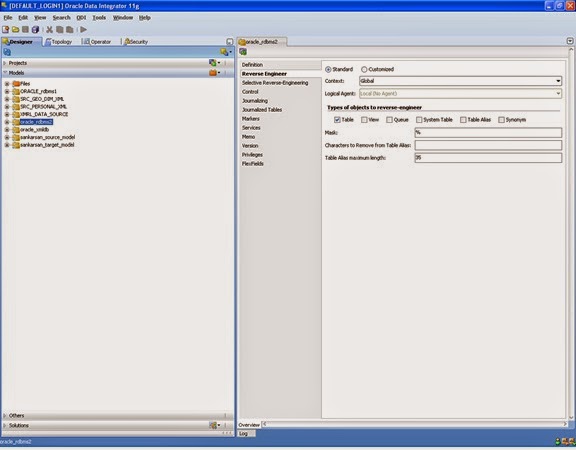
In Definition tab you write the following details-
Name: name of the model.
Code: by default same as model name. You can explicitly change the code.
Technology: the technology used in the data source for which model to be created.
Logical schema: name of the logical schema for which model to be created.
In the reverse engineer tab by default ‘Standard’ mode is selected. If you want to do customized reverse engineer then select ‘Customized’ radio button.
By default Global as ‘context’ and Table as ‘Type of objects to reverse engineer’ selected. You can change them explicitly. You keep the other properties as it is.
Press save button in toolbar.
If you want to selective reverse engineering then under selective reverse-engineering tab check the boxes against ‘selective reverse engineering’, ‘new datastores’ and ‘existing datastores’. If you only particular objects to be reverse engineered then check the ‘objects to reverse engineer’. After populating all the objects to be resided in said logical schema you explicitly select the required objects to be used in reverse engineering.
Press save button.
In  the Model tree you do right click on the newly created model and select reverse engineer while you want to perform the reverse engineering for all the objects resided in same logical schema .After successful reverse engineering you see the objects while expanding the said Model tree.
 
 
Project:
Project is the logical repository in terms of ODI where all the specific activities for a particular ODI login user working on.
For creating a new project click on the following icon in Projects tab and select “New Project”.
After creating a project your next step is to identify the knowledge module to be used for the specified task. There are lots of knowledge modules being used in the different steps of any task e.g. loading, integration, check, journalization, reverse-engineering and service. You have the option to import the appropriate knowledge module from the ODI repository stored in xml-reference folder. Select the proper knowledge module and press ok. A pop-up window is open saying the detailed information of that knowledge module. If you want to save it as your future reference click Save otherwise press Cancel.
 
You can see the detailed information of any knowledge module after clicking on the same knowledge module in the necessary knowledge module category.


Interface:
Interface is the lowest component used in ODI for data loading from source to target area.
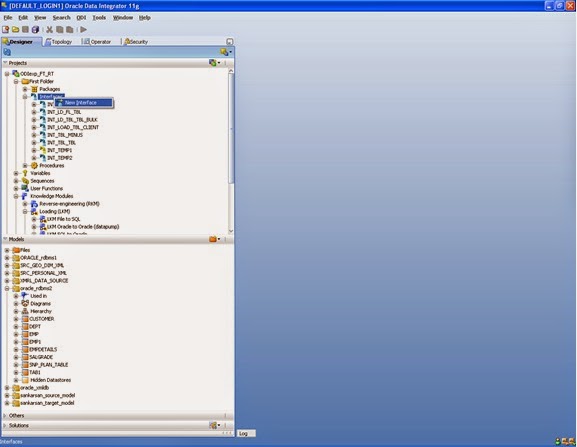
For creating new interface select Interfaces under the First Folder tree in the Projects tab and after right clicking on select New Interface.
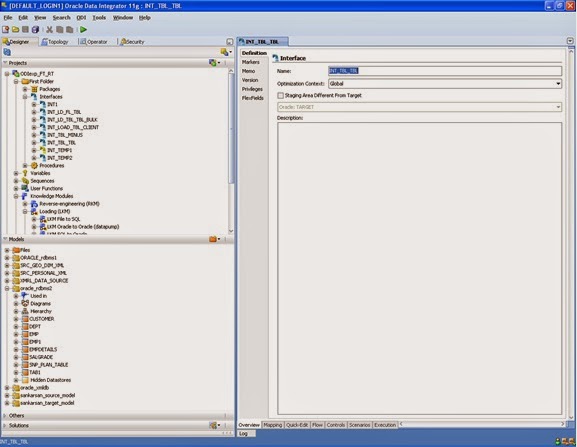
Write thefollowing details in Definition tab.
Name: name of the interface
Optimization context: global by deafult.
If you want the staging area is different from target area then check the box and select the appropriate staging area  from the below drop down list.
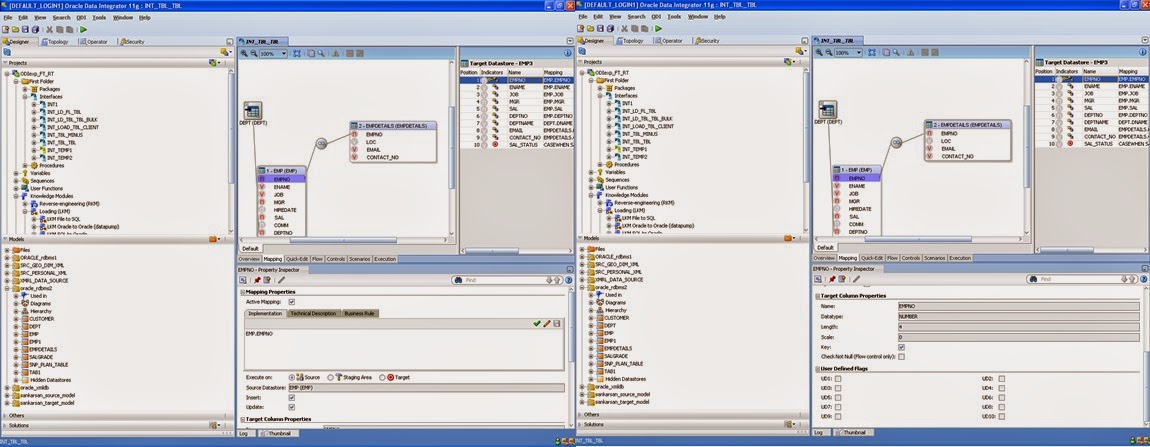
In the mapping editor drag the required objects in source as well as target area.  If you want ODI itself do the mapping instead of you then select the automatic mapping as Yes while this message is being popped up during the objects dragging at target side.
When you select a field under the target area a property inspector is displayed at bottom. The following information populated for each and every field.
Active mapping: If the column is used in mapping then check the box.
In the implementation tab you see the mapping expression. Generally it is the column name at source end. If any customized mapping is required then expression editor is used by clicking on  .
Execute on: It mentions the area where this mapping is being executed. There are three areas – source, staging and target.
Insert: check the box if you want that said mapping is used during insert.
Update: the box if you want that said mapping is used during insert.
Key: If this column used as an unique key to identify the existence of any row of that object, check the box.
Check not null (flow control only): If you want to check the not null on the said column of target area, check the box.
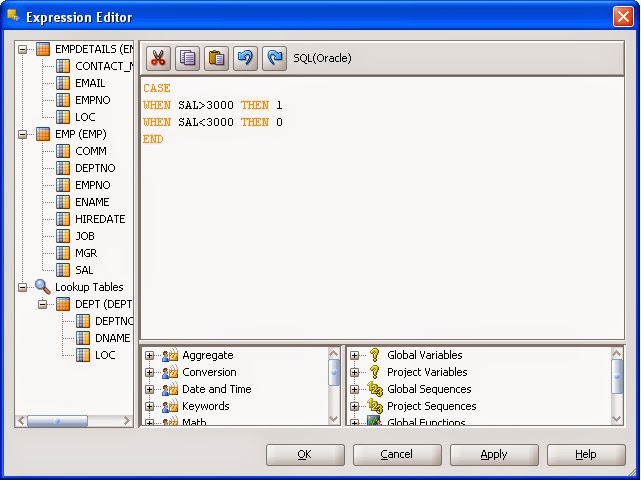
In the expression editor there are three parts –
1) Left hand part shows you the object details.
2) Right hand lower part shows you the different functions of ODI.
3) Right hand upper part shows you a window where you write the customized expression.
You can double click on any column of any table to reflect column name in expression window. In same way you can also double click on any command to reflect it in same window. After completion of expression you press Ok and then apply button. The control backs to go in mapping editor. You select  (tick)  to validate the expression.
In the quick edit tab there are certain extra mappings are used on top of default mapping. These are joins, filters and lookup.
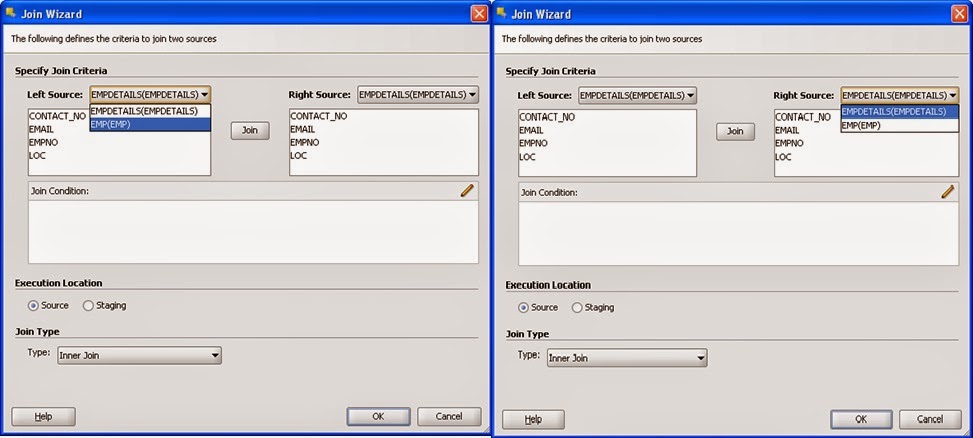
In the Join subheading click on   to add any join mapping. A join wizard is opened. Select the proper tables as the right and left source and click the Join button afterwards. If you need any functions to be intact with any column click on   to add the functions appended on any column. Next properly select the Execution Location and the Join Type parameters.
If you want to use any lookup tables then click on   under the lookup subheading to create any lookup condition. A lookup wizard is opened and you properly select the driving table and lookup table and press Next button. In next window properly select the columns from those two tables and press Join button. Afterwards properly select the suitable options on Execute on and Lookup type parameters.
 

If you want to perform any filetering condition on any source tables need to add any filtering condition through the filter wizard. The wizard is opened after clicking on the   under filter subheading. You select the proper source table and press the ‘Add to filter’ button.In the expression window you may write your customized expression by own or by using expression editor.Select the proper execution location as either source or staging.

Now you see all kind of mapping condition in the quick-edit tab.


In the Flow tab you generally select the appropriate knowledge modules to be used in different stages. While clicking on the SrcSet0 on the source area a property window is shown in below and select the required knowledge module from drop-down list. After selecting the knowledge module you can change the ‘value’ of different options being used in that KM. In same way you select the Staging Area as well as Target to determine the exact KM to be used.
 
In the Control tab you explicitly call the Check KM to isolate invalid data during integration phase.

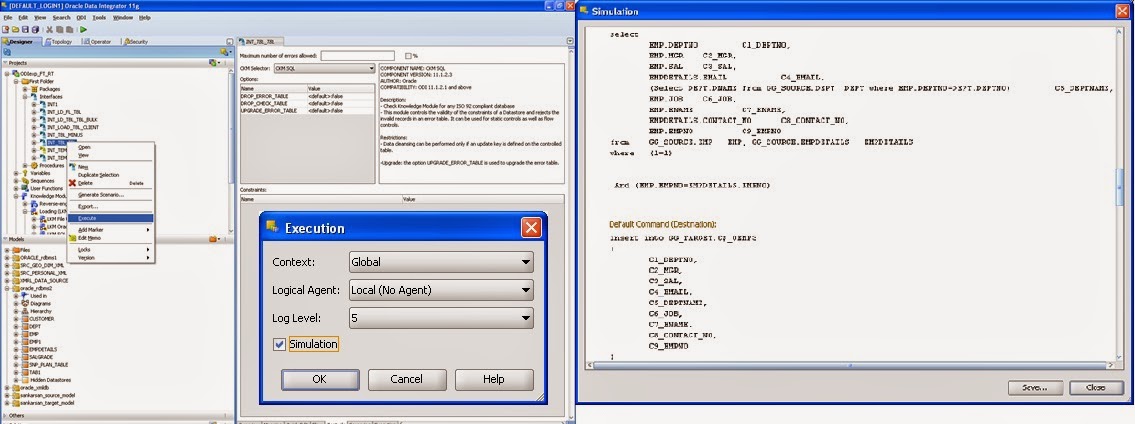
Press the save button from the toolbar. To see the code of interface and execute the interface do right click on the exact interface and select Execute.


A window is opened with the following information.
Context: Name of the context
Logical agent: Name of the logical agent by which you run the interface. This may be Local( No Agent) or any defined Agent.
Log level: select the appropriate log level. By default it is 5.
Simulation: Check it to see the codes generated by ODI internally for that interface.
Press OK.
If you want to save the code for future reference click Save. Otherwise press Close.
To execute the interface uncheck the Simulation parameter of execution window.
You see the execution log details for the interface execution in Execution tree under Operator navigator


For further details on Oracle Data Integrator please mail me to recieve training on demand..
 
 
Regards,
Akash Pramanik

Monday, 6 October 2014

Oracle data Integrator Tutorial --- Part 1

Overview :
Oracle Data Integrator is an integration platform. Simply put, it is used to move and transform information across the information system.
Oracle Data Integrator is also a development platform for integration processes. It is unique in two respects:
• It uses an approach driven by business rules. In this approach, you focus your effort on the business side of integration, and not on the technical aspects.
• It uses the E-LT approach. Oracle Data Integrator does not execute the integration processes itself at run time, but orchestrates a process which leverages existing systems.
Oracle Data Integrator is based on metadata. That is, descriptive information about the information system and its contents. This metadata is stored in a centralized metadata repository.
---------------------------------------------------------------------------


Above picture shows the overall Oracle Data Integrator Architecture.
The central component of the architecture is the repository. This stores configuration information about the IT infrastructure, the metadata for all applications, projects, scenarios, and execution logs. Repositories can be installed on an OLTP relational database. The repository also contains information about the Oracle Data Integrator infrastructure, defined by the administrators.
Administrators, developers, and operators use different Oracle Data Integrator Graphical User Interfaces to access the repositories. Security and Topology are used for administering the infrastructure, Designer is used for reverse engineering metadata and developing projects, and Operator is used for scheduling and operating run-time operations.
At design time, developers work in a repository to define metadata and business rules. The resulting processing jobs are executed by the Agent, which orchestrates the execution by leveraging existing systems. It connects to available servers and requests them to execute the code. It then stores all return codes and messages into the repository. It also stores statistics such as the number of records processed, the elapsed time, and so on.
Several different repositories can coexist in a single IT infrastructure. In the graphic in the previous page, two repositories are represented: one for the development environment, and another one for the production environment. The developers release their projects in the form of scenarios that are sent to production.
In production, these scenarios are scheduled and executed on a Scheduler Agent which also stores all its information in the repository. Operators have access to this information and are able to monitor the integration processes in real time.
Business users, as well as developers, administrators and operators, can get Web-based read access to the repository. The Metadata Navigator application server links the Oracle Data Integrator Repository to any Web browser, such as Firefox or Internet Explorer.
------------------------------------------------------------------


The four Oracle Data Integrator GUIs—Designer, Operator, Topology , and Security , are based on Java.
Designer is the GUI for defining metadata, and rules for transformation and data quality. It uses these to generate scenarios for production, and is where all project development takes place. It is the core module for developers and metadata administrators.
Operator is used to manage and monitor Oracle Data Integrator in production. It is designed for production operators and shows the execution logs with errors counts, the number of rows processed, execution statistics, and so on. At design time, developers use Operator for debugging purposes.
Topology manages the physical and logical architecture of the infrastructure. Servers, schemas, and agents are registered here in the Oracle Data Integrator Master Repository. This module is usually used by the administrators of the infrastructure.
Security manages users and their privileges in Oracle Data Integrator. It can be used to give profiles and users access rights to Oracle Data Integrator objects and features. This module is usually used by security administrators
Repository :
First of all you should know how to create the Master and Work repository used in ODI manually.You can create them during before ODI installtion by using Repository creation utility (RCU).
After successful installtion of ODI you create the master as well as work repository manually.To perform this you first creare the tablespace and schema/user dedicated for each repository and give the necessary privileges to those users.
SQL> create tablespace odim_tab add datafile “d:\oracle\dbf\odim01.dbf” size 1G;
SQL> create user odim identified by odim default tablespace odim_tab temporary tablespace temp;
SQL>grant resource,connect to odim;
SQL> create tablespace odiw_tab add datafile “d:\oracle\dbf\odiw01.dbf” size 1G;
SQL> create user odiw identified by odiw default tablespace odiw_tab temporary tablespace temp;
SQL>grant resource,connect to odiw;
Afterwards go to the File menu and select New.In the new gallery select Master Repository Creation Wizard.Press OK.
----------------------------------------------------------------

In Repository Connection  menu Following details would be required to fill it up.
Technology : Technology used for creating the repositories that means the type of database e.g. oracle, sql server etc.
JDBC Driver : JDBC driver used in specified technology. In Oracle technology it is oracle.jdbc.OracleDriver.
JDBC Url: JDBC url to mention the connectivity of that server. In Oracle technology select jdbc:oracle.thin@<host><port><sid> from the dropdown list and change <host>,<port> and <sid> parameters accordingly.
User: user/schema for master repository. [odim]
Password: password for that user. [odim]
Press Test Connection button to check the connectivity. Press OK in Information window. Click Next.
-------------------------------------------------------

In Authentication menu put the password details for ODI supervisor user SUPERVISOR. You cannot change the ODI supervisor user. Click Next.
In Password Storage select ‘Internal Password Storage’ option and click Finish.
-------------------------------------------------------

After creation of master repository in ODI you have to create the ODI repository login id for master repository. You may have more than one ODI repository login id for a single master repository.
To create ODI repository login id again click New under File menu and select Create a New ODI Repository Login. Then click OK.
-------------------------------------------------------------
A Repository Connection Information window is opened.You have to put  the relevant information in each properties.
Oracle Data Integrator Connetion :
Login name:  user defined name as login name.
User: ODI supervisor user SUPERVISOR. (It is case sensitive and you cannot change it).
Password: password of ODI supervisor user.
Database Connection (Master Repository) :
User: database user of master repository.
Password: database password of above user .
Driver List: select Oracel JDBC Driver from drop-down list.
Driver Name: automatically populate according to driver list selected.
Url: select jdbc:oracle.thin@<host><port><sid> from the dropdown list and change <host>,<port> and <sid> parameters accordingly.
Work Repository :
Select Master Repository Only radio button as you create the ODI login id for master repository.
Click Test button to check the connectivity.Press OK afterwards.
------------------------------------------------------------------------
 
 
 Finally we are able to connect to our Master repository.
---------------------------------------------------------------------------------

Please stay in touch for further updates on ODI. For any information in Database visit "Apps DBA Corner" --- akashpramanik.blogspot.com