To create a work repository right clicks on Work Repositories under Repositories tree in Topology navigator and select New Work Repository.
 A Create Work Repository window is opened and put the following details –
In Step 1 of 2:
Technology : Technology used for creating the repositories that means the type of database e.g. oracle, sql server etc.
JDBC Driver : JDBC driver used in specified technology. In Oracle technology it is oracle.jdbc.OracleDriver.
JDBC Url: JDBC url to mention the connectivity of that server. In Oracle technology select jdbc:oracle.thin@<host><port><sid> from the dropdown list and change <host>,<port> and <sid> parameters accordingly.
User: user/schema for master repository. [odiw]
Password: password for that user. [odiw]
Press Test Connection button to check the connectivity. Press OK in Information window. Click Next.

Name: Name of the work repository.
Password: Password for work repository.
Work Repository Type: Select the nature of work repository .it is Development or Testing or Production.
Click Finish.

Topology:
After logging into ODI your first objective is to create the necessary topologies used for your ODI tasks.
In the topology navigator you have to define the detailed information including technologies, server definitions, schemas, contexts, languages etc.
First of all you define the data server responsible for your source and target database. Expand the technology tree under Physical Architecture and select Oracle. Right click on it and select New Data Server.


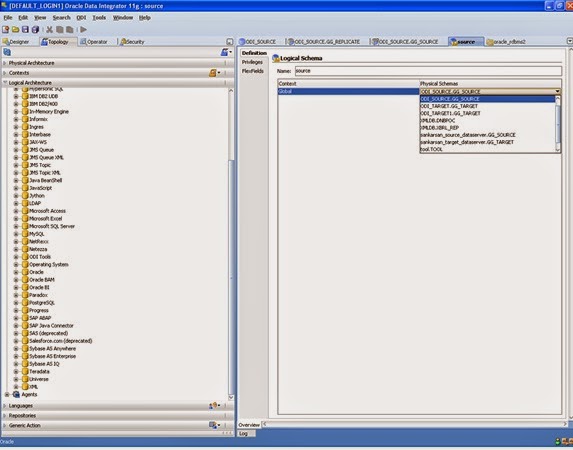
In the Definition tab under logical schema put the following details –
Name: Name of the logical schema.
Select the appropriate physical schema for the Global context (as there is no other context yet to be created)
Press save button in the toolbar.


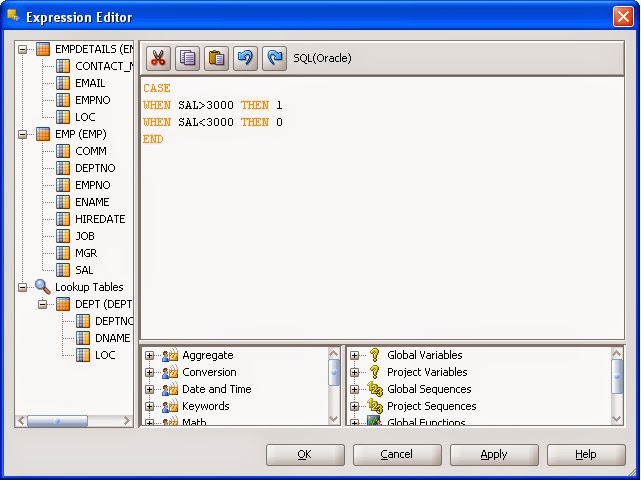 In the expression editor there are three parts –
1) Left hand part shows you the object details.
2) Right hand lower part shows you the different functions of ODI.
3) Right hand upper part shows you a window where you write the customized expression.
You can double click on any column of any table to reflect column name in expression window. In same way you can also double click on any command to reflect it in same window. After completion of expression you press Ok and then apply button. The control backs to go in mapping editor. You select (tick) to validate the expression.
If you want to perform any filetering condition on any source tables need to add any filtering condition through the filter wizard. The wizard is opened after clicking on the under filter subheading. You select the proper source table and press the ‘Add to filter’ button.In the expression window you may write your customized expression by own or by using expression editor.Select the proper execution location as either source or staging.
Now you see all kind of mapping condition in the quick-edit tab.
In the Flow tab you generally select the appropriate knowledge modules to be used in different stages. While clicking on the SrcSet0 on the source area a property window is shown in below and select the required knowledge module from drop-down list. After selecting the knowledge module you can change the ‘value’ of different options being used in that KM. In same way you select the Staging Area as well as Target to determine the exact KM to be used.

A window is opened with the following information.
Context: Name of the context
Logical agent: Name of the logical agent by which you run the interface. This may be Local( No Agent) or any defined Agent.
Log level: select the appropriate log level. By default it is 5.
Simulation: Check it to see the codes generated by ODI internally for that interface.
Press OK.
If you want to save the code for future reference click Save. Otherwise press Close.
 To execute the interface uncheck the Simulation parameter of execution window.
You see the execution log details for the interface execution in Execution tree under Operator navigator

In Step 1 of 2:
Technology : Technology used for creating the repositories that means the type of database e.g. oracle, sql server etc.
JDBC Driver : JDBC driver used in specified technology. In Oracle technology it is oracle.jdbc.OracleDriver.
JDBC Url: JDBC url to mention the connectivity of that server. In Oracle technology select jdbc:oracle.thin@<host><port><sid> from the dropdown list and change <host>,<port> and <sid> parameters accordingly.
User: user/schema for master repository. [odiw]
Password: password for that user. [odiw]
Press Test Connection button to check the connectivity. Press OK in Information window. Click Next.
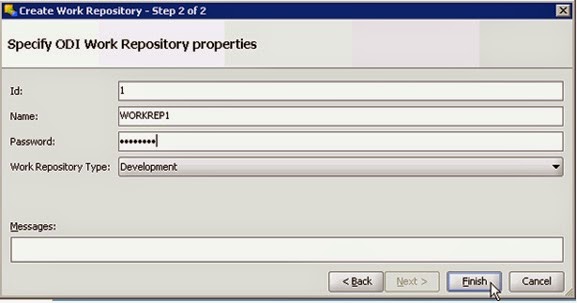
In Step 2 of 2:
Id: Work repository id. By default the first repository under master repository is 1. You can change it.Name: Name of the work repository.
Password: Password for work repository.
Work Repository Type: Select the nature of work repository .it is Development or Testing or Production.
Click Finish.
To connect to specified work repository you click on Connect To Repository… in Topology navigator and select the necessary login name from the drop down list. After putting the proper password press OK.
Topology:
After logging into ODI your first objective is to create the necessary topologies used for your ODI tasks.
In the topology navigator you have to define the detailed information including technologies, server definitions, schemas, contexts, languages etc.
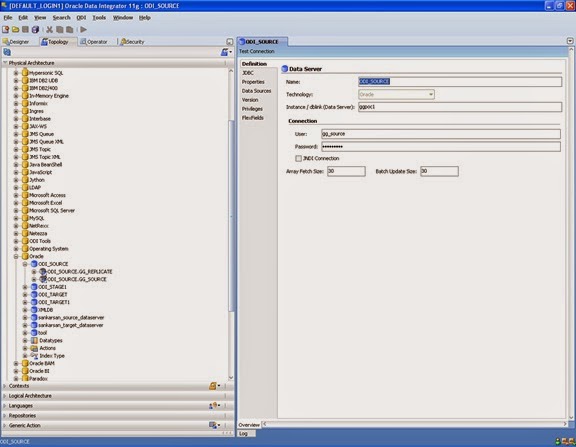
First of all you define the data server responsible for your source and target database. Expand the technology tree under Physical Architecture and select Oracle. Right click on it and select New Data Server.
In the detailed information page under Definition tab write down the following information-
Name: name of the data server.
Instance/dblink (data server): name of the database instance.
User: name of the user of database (except sys/system).
Password: password of that user
Array fetch size and batch update size are the parameters required for row based operation performed by some KM.
You can increase the size for better performance (by default it is 30)
In the JDBC tab put the following information –
JDBC Driver: Select oracle.jdbc.OracleDdriver from the dropdown list.
JDBC Url: Select jdbc:oracle.thin@<host><port><sid> from the dropdown list and replace <host>, <port>, <sid> with the actual information shown in the below picture.
Press save button afterwards.
JDBC Driver: Select oracle.jdbc.OracleDdriver from the dropdown list.
JDBC Url: Select jdbc:oracle.thin@<host><port><sid> from the dropdown list and replace <host>, <port>, <sid> with the actual information shown in the below picture.
Press save button afterwards.
Under Definition tab put the following details-
Schema (Schema) – Oracle schema which is the candidate of either source or target schema.
Schema (Work Schema) – Oracle schema where all kind of work table to be stored .
Check the box against Default to make it default physical schema.
Press save button in toolbar.
Schema (Schema) – Oracle schema which is the candidate of either source or target schema.
Schema (Work Schema) – Oracle schema where all kind of work table to be stored .
Check the box against Default to make it default physical schema.
Press save button in toolbar.
In the Definition tab under logical schema put the following details –
Name: Name of the logical schema.
Select the appropriate physical schema for the Global context (as there is no other context yet to be created)
Press save button in the toolbar.
After creation of all the required topologies your next step is to create the necessary models for the source as well as target database.
Under Designer navigator in the Model tab select the right hand icon and after clicking select New Model.
Under Designer navigator in the Model tab select the right hand icon and after clicking select New Model.
In Definition tab you write the following details-
Name: name of the model.
Code: by default same as model name. You can explicitly change the code.
Technology: the technology used in the data source for which model to be created.
Logical schema: name of the logical schema for which model to be created.
Name: name of the model.
Code: by default same as model name. You can explicitly change the code.
Technology: the technology used in the data source for which model to be created.
Logical schema: name of the logical schema for which model to be created.
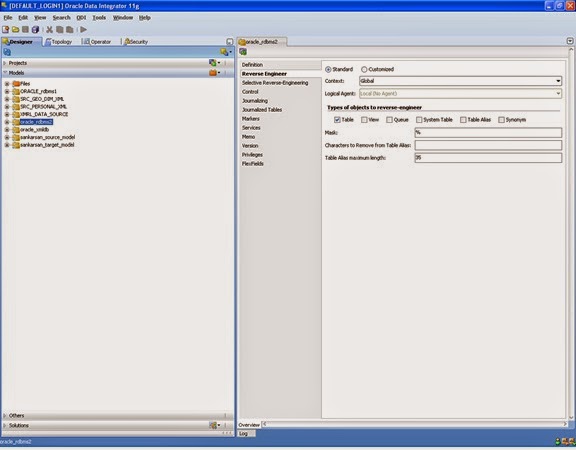
In the reverse engineer tab by default ‘Standard’ mode is selected. If you want to do customized reverse engineer then select ‘Customized’ radio button.
By default Global as ‘context’ and Table as ‘Type of objects to reverse engineer’ selected. You can change them explicitly. You keep the other properties as it is.
Press save button in toolbar.
By default Global as ‘context’ and Table as ‘Type of objects to reverse engineer’ selected. You can change them explicitly. You keep the other properties as it is.
Press save button in toolbar.
If you want to selective reverse engineering then under selective reverse-engineering tab check the boxes against ‘selective reverse engineering’, ‘new datastores’ and ‘existing datastores’. If you only particular objects to be reverse engineered then check the ‘objects to reverse engineer’. After populating all the objects to be resided in said logical schema you explicitly select the required objects to be used in reverse engineering.
Press save button.
Press save button.
In the Model tree you do right click on the newly created model and select reverse engineer while you want to perform the reverse engineering for all the objects resided in same logical schema .After successful reverse engineering you see the objects while expanding the said Model tree.
Project:
Project is the logical repository in terms of ODI where all the specific activities for a particular ODI login user working on.
For creating a new project click on the following icon in Projects tab and select “New Project”.
After creating a project your next step is to identify the knowledge module to be used for the specified task. There are lots of knowledge modules being used in the different steps of any task e.g. loading, integration, check, journalization, reverse-engineering and service. You have the option to import the appropriate knowledge module from the ODI repository stored in xml-reference folder. Select the proper knowledge module and press ok. A pop-up window is open saying the detailed information of that knowledge module. If you want to save it as your future reference click Save otherwise press Cancel.
You can see the detailed information of any knowledge module after clicking on the same knowledge module in the necessary knowledge module category.
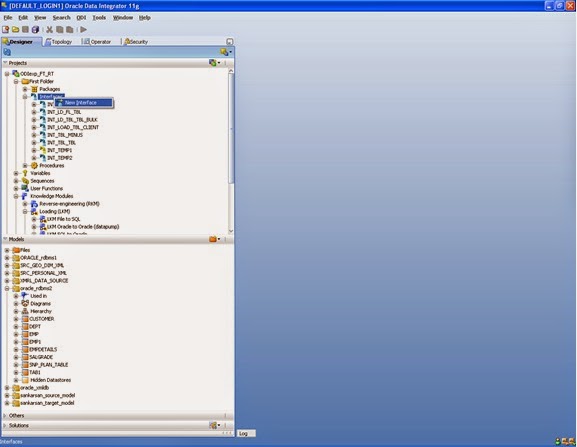
Interface:
Interface is the lowest component used in ODI for data loading from source to target area.
For creating new interface select Interfaces under the First Folder tree in the Projects tab and after right clicking on select New Interface.
Interface is the lowest component used in ODI for data loading from source to target area.
For creating new interface select Interfaces under the First Folder tree in the Projects tab and after right clicking on select New Interface.
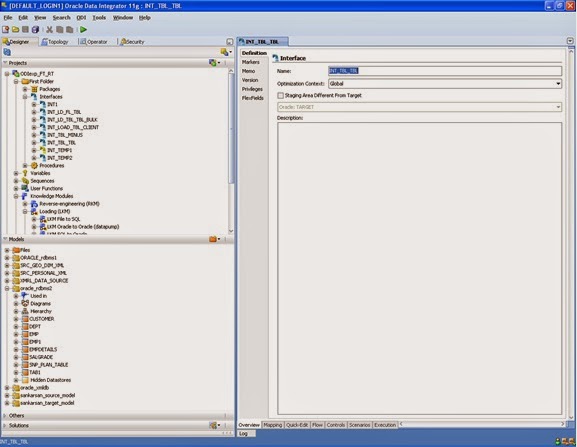
Write thefollowing details in Definition tab.
Name: name of the interface
Optimization context: global by deafult.
If you want the staging area is different from target area then check the box and select the appropriate staging area from the below drop down list.
Name: name of the interface
Optimization context: global by deafult.
If you want the staging area is different from target area then check the box and select the appropriate staging area from the below drop down list.
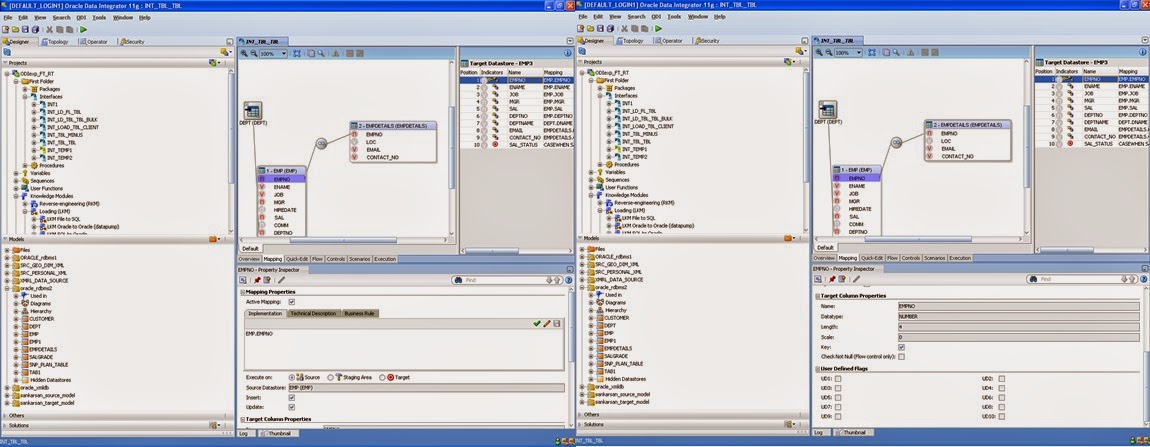
In the mapping editor drag the required objects in source as well as target area. If you want ODI itself do the mapping instead of you then select the automatic mapping as Yes while this message is being popped up during the objects dragging at target side.
When you select a field under the target area a property inspector is displayed at bottom. The following information populated for each and every field.
Active mapping: If the column is used in mapping then check the box.
In the implementation tab you see the mapping expression. Generally it is the column name at source end. If any customized mapping is required then expression editor is used by clicking on .
Execute on: It mentions the area where this mapping is being executed. There are three areas – source, staging and target.
Insert: check the box if you want that said mapping is used during insert.
Update: the box if you want that said mapping is used during insert.
Key: If this column used as an unique key to identify the existence of any row of that object, check the box.
Check not null (flow control only): If you want to check the not null on the said column of target area, check the box.
In the expression editor there are three parts –1) Left hand part shows you the object details.
2) Right hand lower part shows you the different functions of ODI.
3) Right hand upper part shows you a window where you write the customized expression.
You can double click on any column of any table to reflect column name in expression window. In same way you can also double click on any command to reflect it in same window. After completion of expression you press Ok and then apply button. The control backs to go in mapping editor. You select (tick) to validate the expression.
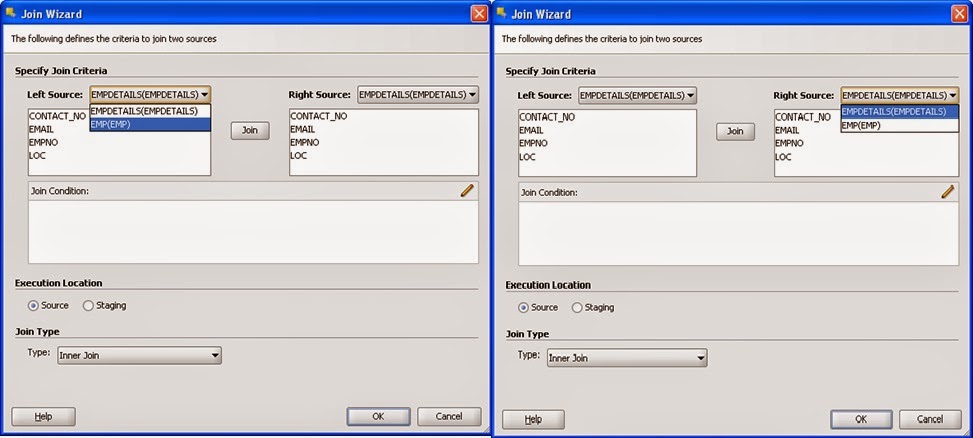
In the quick edit tab there are certain extra mappings are used on top of default mapping. These are joins, filters and lookup.
In the Join subheading click on to add any join mapping. A join wizard is opened. Select the proper tables as the right and left source and click the Join button afterwards. If you need any functions to be intact with any column click on to add the functions appended on any column. Next properly select the Execution Location and the Join Type parameters.
In the Join subheading click on to add any join mapping. A join wizard is opened. Select the proper tables as the right and left source and click the Join button afterwards. If you need any functions to be intact with any column click on to add the functions appended on any column. Next properly select the Execution Location and the Join Type parameters.
If you want to use any lookup tables then click on under the lookup subheading to create any lookup condition. A lookup wizard is opened and you properly select the driving table and lookup table and press Next button. In next window properly select the columns from those two tables and press Join button. Afterwards properly select the suitable options on Execute on and Lookup type parameters.
If you want to perform any filetering condition on any source tables need to add any filtering condition through the filter wizard. The wizard is opened after clicking on the under filter subheading. You select the proper source table and press the ‘Add to filter’ button.In the expression window you may write your customized expression by own or by using expression editor.Select the proper execution location as either source or staging.
Now you see all kind of mapping condition in the quick-edit tab.
In the Flow tab you generally select the appropriate knowledge modules to be used in different stages. While clicking on the SrcSet0 on the source area a property window is shown in below and select the required knowledge module from drop-down list. After selecting the knowledge module you can change the ‘value’ of different options being used in that KM. In same way you select the Staging Area as well as Target to determine the exact KM to be used.
In the Control tab you explicitly call the Check KM to isolate invalid data during integration phase.
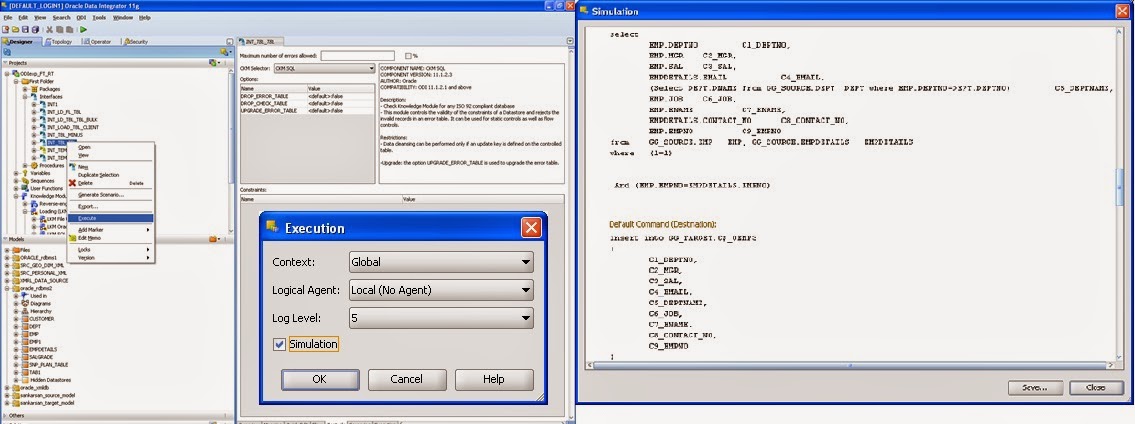
Press the save button from the toolbar. To see the code of interface and execute the interface do right click on the exact interface and select Execute.
Press the save button from the toolbar. To see the code of interface and execute the interface do right click on the exact interface and select Execute.
A window is opened with the following information.
Context: Name of the context
Logical agent: Name of the logical agent by which you run the interface. This may be Local( No Agent) or any defined Agent.
Log level: select the appropriate log level. By default it is 5.
Simulation: Check it to see the codes generated by ODI internally for that interface.
Press OK.
If you want to save the code for future reference click Save. Otherwise press Close.
To execute the interface uncheck the Simulation parameter of execution window. You see the execution log details for the interface execution in Execution tree under Operator navigator
For further details on Oracle Data Integrator please mail me to recieve training on demand..
Regards,
Akash Pramanik


