Oracle E-Business Suite Installation Guide(Release 12.2 (12.2.0))
Rapid Install offers two options for a new installation: a standard installation, which involves creating a new system using system-specific configuration parameters, and an Express installation, where Rapid Install supplies default values for many parameters, requiring only a few to be supplied by the user carrying out the install.
In this Post we shall use the Standard Installation which is most commonly used Installation techniques in Real-time Projects.
Standard Installation
- A fresh database is fully configured and ready to be used for a new implementation. This type of database is suitable for any type of system that requires a fresh database, such as a production system or test system. The default name for a production database is PROD. If you are installing a database for another use, for example as a test system or a backup system, choose the Fresh Database option and enter a database name that reflects its purpose, for example TEST.
- A Vision Demo database is used for demonstration or training purposes. It contains a fully configured Oracle E-Business Suite system that has been implemented and populated with a set of transactions for a fictitious company. The Vision Demo database is set up for multiple-organization use. It is installed with the AL32UTF8 character set to maximize the support for character sets in this release. The default database name is VIS.
oracle.sysman.assistants.rconfig.engine.InvalidConfigurationException:Node that has single instance database running should be specified in the NodeList.Please specify node TESTSYS as part of NodeList atoracle.sysman.assistants.rconfig.engine.ClusterStep.checkNodeList(ClusterStep.java:203)
This section describes the setup steps for a standard installation, where the user supplies various system-specific parameters.
Important: Before you perform the steps described in this section, you must have created a stage area. You do not carry out the installation steps on every node that will be part of your Oracle E-Business Suite system. You carry them out on the database node and primary Applications node, apply the latest release update packs, then use standard cloning commands to scale up to the required number of Applications nodes.
Start the Rapid Install wizard
Start the wizard from the command line by entering rapidwiz at the prompt. The Welcome screen lists the database and the technology stack components that are installed with Oracle E-Business Suite.
This screen lists the components that are included in, or supported by, this release of Oracle E-Business Suite. You can expand the component lists, using the scroll bar to bring all the components into view.
A new installation includes a fresh Oracle 11g Release 2 (11gR2) database. In an upgrade, Rapid Install can optionally create an Oracle 11gR2 database Oracle Home without a database. You can use this Oracle Home to upgrade or migrate your existing database to Oracle 11gR2. Alternatively, you can choose to use a suitable existing Oracle Home.
Welcome Screen

This screen is for information only. No decisions need to be made. When you have reviewed the information, click Next to continue.
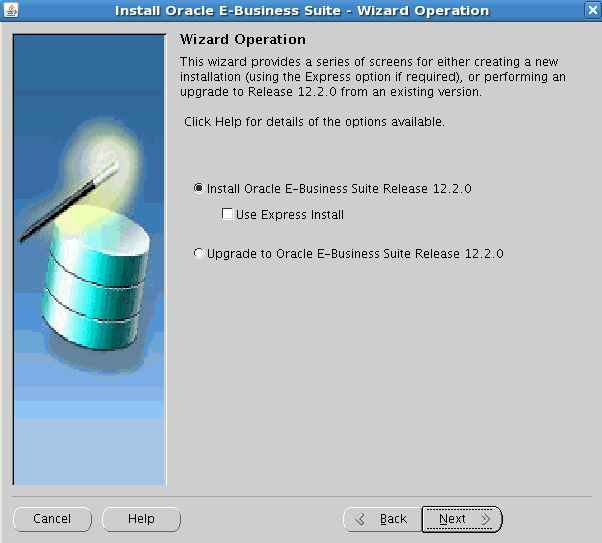
Select Wizard Operation - Install Oracle E-Business Suite Release 12.2.0
Supply Email Details for Security Updates

If submission of your details fails because no connection can be made, you are presented with a pop-up screen prompting for proxy server information:
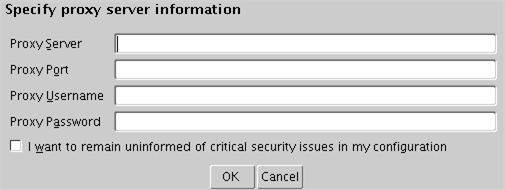
If this screen appears, respond appropriately and then click OK.
Configuration Choice

If you choose Create a new configuration , Rapid Install saves the configuration parameters you enter on the wizard screens in the Oracle E-Business Suite database, and in a configuration file (conf_<SID>.txt), which is stored in your system temporary directory until the installation is completed.
If you choose Load the following saved configuration, the database connect string field becomes active. For a configuration stored in the database, this field is made up of <hostname>:<SID>:<database port>, for example server1.example.com:VIS:1521.
Important: The host name must include the domain.
Enter the appropriate database connect string (or conf_<SID>.txt file location, if applicable) to point Rapid Install to a stored configuration whose parameters you wish to use. Typically, you would choose this option when performing a multi-node install.
Note: If Rapid Install is being run on the database tier using the Load the following saved configuration option, you must enter the default password for the APPS database user.
After completing this step, click Next to continue.
Global System Settings
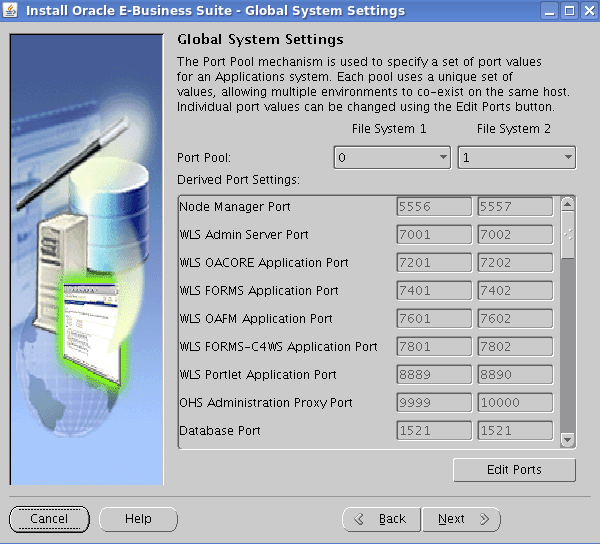
The default value of the Port Pool set is zero, but you can customize it by selecting another value from the drop-down list in the Port Pool field. There are 100 port pool selections: if you select an increment of 3, the default values are increased by that value. The Database Port (1521) becomes 1524, the RPC Port (1626) becomes 1629, and so on.
At this point, you can simply accept the values for the chosen Port Pool (and therefore individual ports) by clicking Next. This will suffice for many installations.
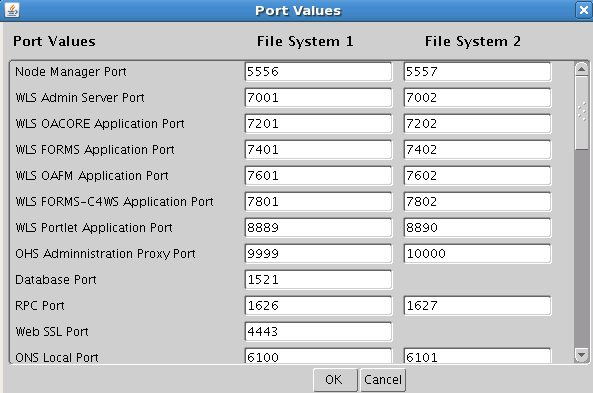
Otherwise, you can add an extra level of sophistication by specifying individual port values to meet particular site-specific requirements, over and above the basic use of the Port Pool mechanism described above. For example, you might wish to avoid using a particular port for some reason, perhaps because it will be needed by some other software. Clicking on the Edit Ports button will open a screen that allows you to specify the values of any ports you wish.
When finished on this screen, click OK to return to the Global System Settings screen, and click Next on that screen.
On the Database Node Configuration screen, indicate the kind of database you want to install in the new system, the name you will use to identify it, the machine on which it will run, and that machine's domain name. You then need to confirm the operating system shown on the drop-down list is correct, specify the Oracle user's operating system account name and group, and finally specify the base directory under which the installation is to take place.
Database Node Configuration

The Database Base Dir field defaults to a sample directory name, using the operating system syntax for the machine where you started the Rapid Install wizard. This directory is the top-level directory that Rapid Install uses to derive the mount points associated with the database.
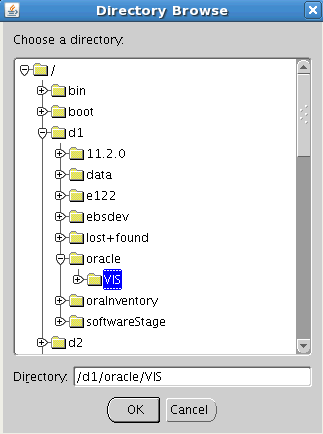
On this screen, click on a suitable folder, or type a path in the Directory field. Click OK to confirm your choice and return to the Database Node Configuration screen, or click Cancel to return without making a selection.
As well as letting you specify the type of storage where the database files will reside, the Database Node Configuration screen enables you to specify whether this database node will be part of an Oracle Real Application Clusters (Oracle RAC) system.
Before you perform an Oracle E-Business Suite installation on Oracle RAC, you must ensure that the necessary Oracle Grid infrastructure is in place. For instructions on how to do this, refer to Section 5: "Use Rapid Install to Install a RAC Configured Oracle E-Business Suite Release 12.2 system" of My Oracle Support Knowledge Document 1453213.1, Using Oracle 11g Release 2 Real Application Clusters and Automatic storage management with Oracle E-Business Suite Release 12.2. Failure to follow these instructions will result in problems during Oracle E-Business Suite installation in your Oracle RAC environment.
Important: When installing the Grid Infrastructure, you must specify the hostname in lower case. Otherwise, Rapid Install will fail with an error like this:
In this example, the issue was caused by the hostname TESTSYS being in upper case.
Important: The setting of the compatible database initialization parameter must be the same for both the Oracle E-Business Suite database and the ASM instance and ASM disk groups. The Oracle E-Business Suite database parameter is set to 11.2.0 for all platforms except Exadata, where it is set to 11.2.0.2.
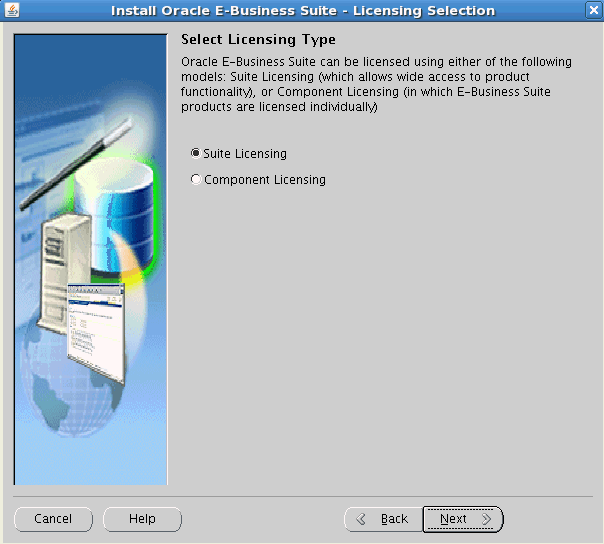
Select Licensing Type
When installing a fresh database (not a Vision demo database), the wizard prompts you to indicate the type of licensing agreement you have purchased from Oracle. It then presents the appropriate licensing screen.
Completing a licensing screen does not constitute a license agreement. It simply registers your products as active. The only way to set up a license agreement is to purchase Oracle E-Business Suite products through the Oracle Store or an Oracle sales representative. You should have complete information about your product license before you complete the licensing screens.
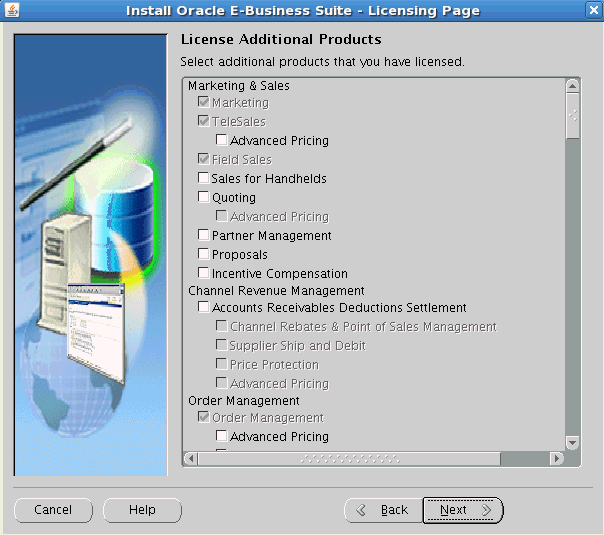
License Additional Products
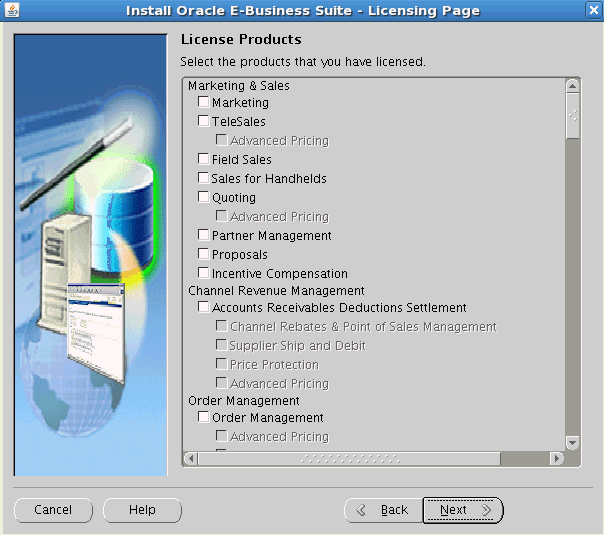
License Products
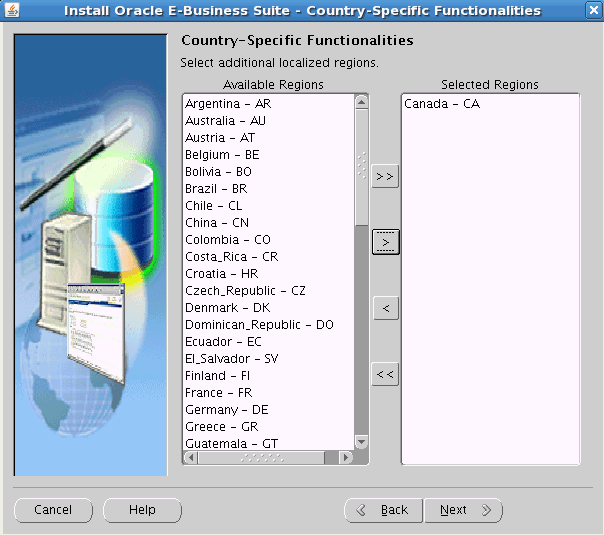
Select Country-Specific Functionalities - Initial Screen
Select Country-Specific Functionality (Fresh Database installation only)
Some systems require the country-specific functionality of a localized Oracle E-Business Suite product. For example, if your company is based in the United States but also operates in another country, products such as Human Resources require additional features to accommodate the labor laws and codes that differ from those in the United States. You register the name of the region associated with the localized product on the Select Country-specific Functionality screen.
If your company operates only in the United States, you can bypass this screen. If you begin doing business in another country at a later date, you can use License Manager to register the associated region at any time after the original installation or upgrade.

Select Country-Specific Functionalities - Subsequent Screen
Select Internationalization Settings
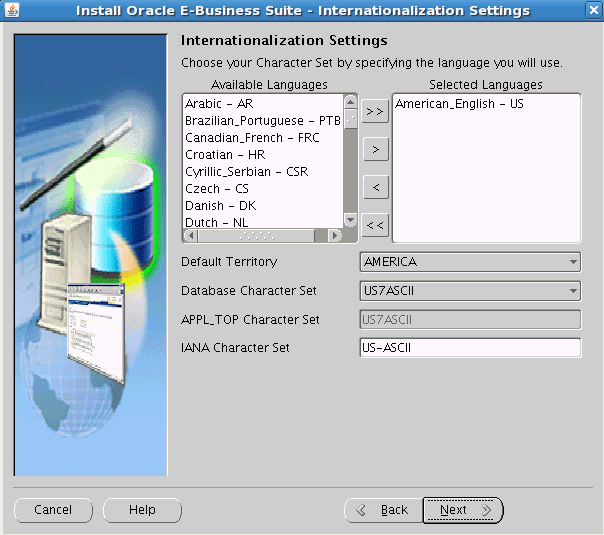
The languages you select help determine the available options for the other NLS-related configuration parameters (such as territory and character set) that your system requires and can support.
Note: See Globalization Support in Oracle E-Business Suite Concepts.
Primary Applications Node Configuration - UNIX
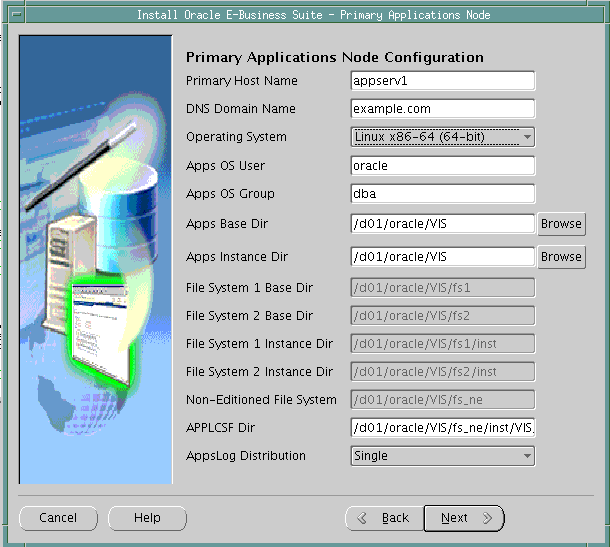
The default sample directories use the syntax of the operating system where you started Rapid Install. In addition, some of the fields are specific to the operating system in use.
The above example shows this screen for a Linux system, where you need to complete the information for Apps OS User (the account that owns the Applications tier file system and technology stack) and Apps OS Group (the group to which the Apps OS User belongs). Accept the defaults, or enter new values.
On all these Primary Applications Node Configuration screens, the Base Directory is the top-level directory that Rapid Install will use to derive the mount points for the Applications nodes. You can accept the defaults or enter new values.
Important: You must accept the system-supplied defaults for the derived mount points.
The services provide the following functionality:
| This Service Group: | Supports: |
|---|---|
| Root Service |
|
| Web Administration |
|
| Web Entry Point Services |
|
| Web Application Services |
|
| Batch Processing Services |
|
| Other Services |
|
- Perform the installation on the node that has been chosen to have the Web Administration (WLS Server Administration) and Web Entry (Oracle HTTP Server) service groups enabled, and then run AutoConfig on this node.
- Be aware that when subsequently installing on the secondary (managed) nodes, Rapid Install will not run adstrtall.sh, so services will not be running and the installer will display a message to this effect at the end of the install. This failure of the post-install checks is expected.
- To support Web and Forms services: Root Service, Web Entry Point Services, Web Application Services
- To support Concurrent Processing services: Batch Processing Services
Supply Application User Information
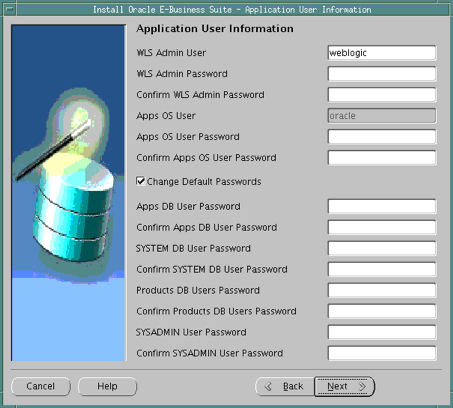
The Apps OS User password is needed for setting up Secure Shell (ssh) on the application tier nodes, and must be the same on all these nodes.
The checkbox to change the default passwords is automatically ticked when this screen appears. We strongly recommend accepting this, and changing the passwords accordingly. If you wish to retain the standard passwords, untick the box.
Review Node Information
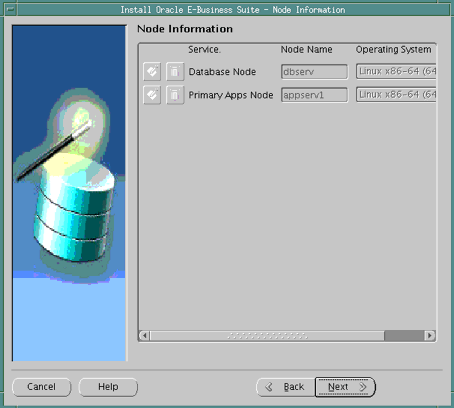
At this stage, you have specified details for the database node and the primary Applications node. Instead of creating additional Applications nodes using Rapid Install, you complete the Rapid Install run, apply the latest AD and TXK patches, and then clone the primary Applications node to create as many additional ones as you need. This avoids the need to apply the patches to multiple nodes, saving time and effort and reducing the risk of error.
Pre-Install Checks
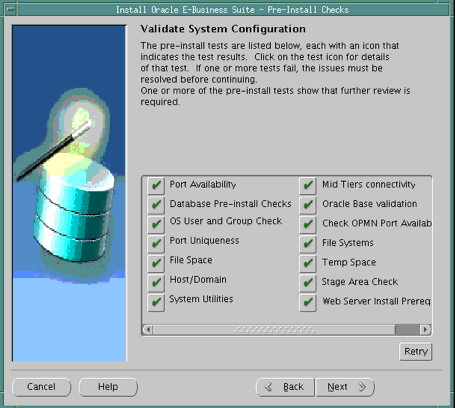
The parameters that Rapid Install validates and reports on this screen include:
The results of each test are labeled with icons. There are three result types:
- Tick (check mark)
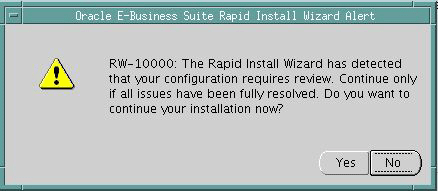
The test succeeded. Click the tick to see details of the test performed. - Exclamation mark (!)
The configuration requires review. Click the ! to get information about the system test review. Click Yes to continue, or No if you are going to resolve the issues. Rapid Install displays an alert if you continue without resolving the issues. - An x mark
All issues marked x must be resolved before you continue with the installation. Click the x to see the errors. If you can resolve an issue by altering the values provided on one of the wizard screens, click Back until you reach the appropriate screen, and re-enter the values. Some tests must be resolved in the operating system. In that case, you may have to restart the Rapid Install wizard after the problem has been fixed.
If problems are identified, a pop-up window will appear:
Configuration Alert
When you have resolved any issues, click Next on the Validate System Configuration screen to continue with the installation.
Important: For an upgrade with an existing Oracle Home, when the database is down the following pre-checks will show a warning as they cannot be tested automatically (Bug 20083150). You should manually ensure that the check results are correct.
Review Components

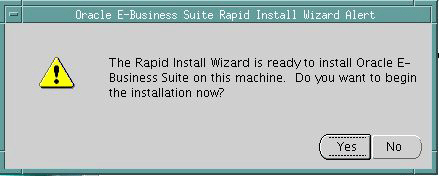
Click Next. Rapid Install now displays another alert screen asking you to verify that you are ready to begin the installation. Click Yes.
Begin Installation
Installation Progress
During an installation, Rapid Install displays a main progress bar and an individual progress bar. The main progress bar reports on the completion percentage of the installation as a whole. The individual progress bar reports on the progress of each individual step.
Warning: The installation is not complete until all the progress bars disappear from your screen.

Post-Install Checks
If there is an ! or x icon, click it to see the details. If any of the checks fail, refer to the Rapid Install log files to determine the reason, and resolve each problem before continuing. When the errors are fixed, click Retry to perform the post-install validation again.
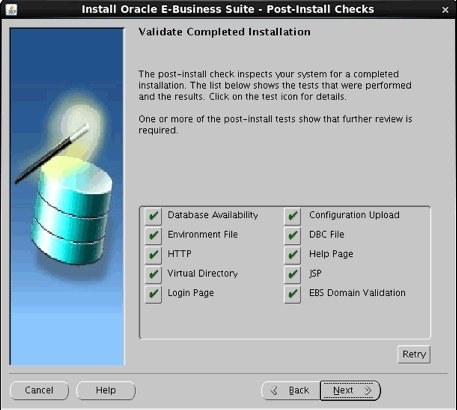
If you wish to review the Post-install Checks screen, click Back. If you want to log on to Oracle E-Business Suite now, click Connect to Oracle Applications Release 12.2.0 to access the Oracle E-Business Suite Login page. Otherwise, click Finish to complete the Rapid Install session.
##Please comment and write to me at akash007.pramanik@gmail.com
###### Disclaimer - This is a general purpose document for reference purpose. Please contact me on mail for any professional help on E-Business Suite or any Database Technologies.
Author - Akash Pramanik
Database Technology Consultant
Mail - akash007.pramanik@gmail.com
Wow, Excellent post. This article is really very interesting and effective. I think its must be helpful for us. Thanks for sharing your informative.
ReplyDeletesocial exchange sites
earn money online
social bookmarking sites list
directory submission site list
article submission sites
blog commenting sites
forum posting sites
press release sites list
outsourcing
off page seo
seo tutorial
free seo tools
freelancing
freelancing sites
seo
online shopping sites
online shopping
shopping online
books online
games online
shop online
365 online
shopping
e online
online
ReplyDeleteI find the required information on Oracle ODI. Thanks for providing your information on
Oracle ODI online training.